Guide to develop a catalog in RDMO
Introduction
This document is a guide to creating catalogues. It contains step-by-step instructions for creating a simple Catalog. If you have never created a Data Management Plan (DMP) catalogue in RDMO, it is recommended that you work through these steps on your own instance of RDMO. You will be introduced to important RDMO concepts, terminology, structure, hierarchies and dependencies, and can then apply this knowledge to create your own catalogue.
RDMO is a tool for creating DMPs. A DMP is a documentation of the RDM practices of your research project over the entire data lifecycle. RDMO offers several DMP catalogs, whether for a specific funder or discipline, or just generic templates for any research project. A Catalog is a set of questions about data management practices throughout the data lifecycle, so it’s a comprehensive set of questions to think about and document all the data and data management practices for your research project.
Specialist users of RDMO with administrative rights (or have the role of editor) can customise the Catalog or create new Catalogs.
Before deciding to create a new Catalog, you should check whether you have the rights to do so and whether there is already a catalogue that meets your needs.
Explanation of the general relationships
Hierarchy of the elements of a Catalog
Some might also call it Questionnaire or Interview, depending on the version, they are working on.

Overview of the RDMO Hierarchy
Catalogs consist of (thematically distinct) Sections, which may span multiple pages. Pages are essentially (the entire scrollable area of) screens containing the questions (possibly organised into question sets). Questions can be of different types, distinguished by the type of response expected (e.g. text box, checkbox, date picker or range slider).
The creation of a new Catalog must be done in this order, and this is the order in which it is described in this manual.
Getting started
Before we can start creating our new Catalog, we need to make sure your RDMO is set up correctly.
Requirements
A running RDMO instance. In this guide, we assume that we are using a freshly installed RDMO instance of version 2.X or higher.
A user with at least the Editor Role. Administrator privileges are not required. For more information see role management.
Check that you can see
Managementin the top navigation bar. If so, you are an Editor and can create a new Catalog.
The newly installed RDMO instance is still empty, i.e. there are no questionnaires, attributes, views, etc. available.
Import Attributes
If not already done, import the default Attributes first (you will need them later):
Download the default attributes (an xml file
attributes.xml). You can rename this file as you wish.Go to the
Managementsection in the top navigation bar.
Select the previously downloaded XML file from the import option on the right hand side of the web page and click on theimportbutton.

Import XML File
In the next step, RDMO will show a summary of all the Attributes that will be imported. Continue with the import button at the top. It may take a while for the “import successful” message to appear.
Caution
If Attributes, Options, and Option sets are imported and they already exist, they will be updated. Any local customisation of the default Attributes / Options will be overwritten.
Import options and Option sets
If not already done, import the default option sets:
Go to the
Managementsection andimportthe “optionsets.xml” file in the same way as you imported the attributes before. RDMO will again show you a summary of all the option sets being imported.Continue with the import button.
Building your first Catalog
In this guide we will show you how to create a simple catalog to help you get started. We will show you how to create a catalog with two sections and two pages. All the steps we provide can be repeated to create a full catalog.
The Catalog we have in mind should ask for:
the funding body of the project
the creators of each data sets and the size of each data sets
The funding (body) question should be on one Page and the Questions about the datasets on a second Page. Users can add datasets as they wish, and each dataset can have multiple creators.
In the end, the Catalog should look something like this mockup:
![]()
Empty Project Page
The Page on the left shows the Question about the funding body, and the Page on the right allows users to create different tabs (one for each dataset). For information about the creator(s) of the dataset(s), different creators can be added using the button below the last creator.
Initial setup
You should see a screen like this when you open RDMO:

First Page after Login
Click on Management in the top navigation bar. In a fresh RDMO it will look like this:

Creating a new Catalog
Check that the heading under management is Catalogs, if not click on Catalogs in the right-hand navigation pane.
Info
While many RDMO instances will already have existing Catalogs, this guide assumes that the RDMO instance is completely empty. This ensures that our screenshots are free of distracting elements, making it easier to focus on the process. If your instance contains some catalogs, that’s fine — this example will still apply.
Creating a new Catalog
Now let us create a new Catalog. Click on the New button at the top-right corner. You should now see something like this:

Creating a Catalog - Overview
There are several fields we need to fill in:
The URI Prefix should already be set by your administrator. Although you can choose a different
URI Prefix, such as your institution’s URI, it will be used to indicate where the Catalog was created.If you change the prefix and wish to revert to the default value set for the RDMO instance, you can simply click on the “magic wand icon” to reset the entry back to the default value.
The URI Path should be a unique label for your Catalog. Choose a label that is appropriate for your purpose. In our example, we choose to have “http://rdmo.local” and “example-catalog” as the
URI PrefixandURI Pathrespectively.

URI of the created Catalog
The
Commenttext box is an input field that will later only be visible to managers or administrators. It can be used, for example, to indicate recent changes or who is responsible for maintaining the Catalog.The “available” button indicates that the catalog is available for use by the users. If the button is unchecked, users cannot see the catalog in the list.
By activating the “locked” button, only Admins can edit this Catalog.
The
Titletext box is for the title of the Catalog. We choose “Meaningful Catalog”.In the
Helptext box, you can enter details about the Catalog. This text will be visible to the users in the catalog overview when they create a project. So the help text should explain what this catalog is intended for (e.g. it is specifically designed for art history research projects).If your RDMO supports multiple languages, you should fill in all the fields in all the languages.
You can also give your new Catalog an order. The order is just a number that determines the order in which the Catalogs are displayed in the various RDMO menus. If the RDMO instance has just been set up, any small number should be fine (e.g. “1”).

Explanation of the Fields
Info
If you also see the Sites and Editors fields , you are on a hosted RDMO service / multi-site instance of RDMO. Sites allows you to specify on which sub-instances the Catalog will be available and Editors allows you to select who can edit the Catalog.

Sites and Editors
For the next step, click on Create and continue editing at the bottom of the page.
Creating Sections
We will now add a first Section to this Catalog. Note that you can reuse an already existing Section from other Catalogs available on your RDMO instance. Here we will create a new Section.
Under the heading “Sections” click on Create new section. You should now see something like this:

Creating Sections
By default, RDMO displays the URI Path of the Catalog the Section is attached to - in our case “example-catalog”. Change the URI Path according to the content of the section. There are currently no best practices in the RDMO community but try to be consistent within your catalog. Here we choose “example-section-01”.
Note that you must use a different URI Path because each object in RDMO needs a unique URL. Otherwise, RDMO would not know which object you want to include in your DMP questionnaire. If you accidentally choose a URI Path that is already in use, RDMO will complain when you try to save.
Enter the Title of the Section. This will be displayed prominently in the questionnaire. You can enter a Short title for this Section which will replace the long title in the navigation bar displayed to users of the catalog.
Click Create and continue editing to create the new section.
At the top of the web page you should now see that the section is being used in a Catalog. You can click on the down arrow to view this catalog. It is the one we have just created. If you reuse this section later in another Catalog, it will also appear here.

Indicator how often a Section is used in different Catalogs
Creating Pages
We will now create our first Page. An RDMO page contains Questions that are presented to the user on a single web page/screen. Think of a Page as the analogue of an actual paper page in a classic questionnaire. We recommend that you do not put too many questions on a page - users do not like to scroll.
To create a Page, click Create Page in the Section we created in the previous step. Again, you could reuse an existing Page, but we are going to create a completely new one..

Creating a Page
Make sure that the URI Path is unique. You can change this as shown in the previous steps.
Fill in the page
Title. In our case, we use “Funding Body Information” for the title. It will be displayed prominently at the top of the Page in the questionnaire.Next, we enter the
Short title. This will be used in navigation bars and menus. We will use “Funding” as the short title.You can also use the
Helpfield to provide useful information for users, such as explaining what this Page is about.Now click on the button
Create and continue editing.

Creating a Page
What we do not need to fill in:
Note that we do not check if it is collection, we do not fill in the Name field, and we do not assign an Attribute. You only need these fields if the page is to be a Collection. We will explain what this means in detail when we create our second page.
We will also ignore the Conditions part for now. This feature allows us to show or hide pages (and Question sets and Questions) depending on the user’s answers to previous questions. We will skip this feature for this basic guide.
Adding Questions to Pages
We will now add a new element to our page. Elements can be Questions or Question sets. In our example, we want to use this first Page to ask Questions on the project’s funding, so we will click on Create new question in the Elements area.

Add Elements to the Page
Fill in the
URI PrefixandURI Pathas before. Note that the path must be unique.In the
Textfield, type the Question you want to ask. Here we have written, “Who is funding the project?”.The
Helpfield again provides helpful information. In this case, here is an example of an entry:

Create a Question
Other remarks: We do not need the
Namefield, as the Question is not a Collection. But it would be no problem to enter some text in this field.Next, we will select an Attribute. In the next sections we will look at the use of attributes in more detail. For this example, we have chosen
https://rdmorganiser.github.io/terms/domain/project/funder/name
Info
Important Note: Each Attribute must only be used once in a Catalog. If you use an Attribute twice, the answers to different Questions will overwrite each other. There is only one exception, where an Attribute can be used more than once. We will cover this later when we create the next Page.
The ‘Widget type’ allows you to define the type and answer possibilities of your current Question (e.g.
Textareafor longer answers,Textfor short answers orRadio buttonsfor pre-defined answers). We will cover radio buttons and pre-defined answers later when we create the Question set. For now, we will chooseText,as usually only a short line is needed for names.

Provide a Widget type
Creating Pages as a Collection
Now we are going to create a second Page that will be a Collection. In our example, we want to use this page to ask Questions about the datasets created in a project.
By making the page a collection, we are telling RDMO that we want to allow users to answer the questions on this page multiple times - each time for a part of the collection. In our case, they can give separate answers for each dataset.
If you saved our previous page and proceeded, you should now be back at the Section level. To create a second Page, simply click
Create Pageagain.If you have accidentally closed the Section window or taken a break, you can also start by clicking on
Catalogson theManagementpage. This will display all the available Catalogs. Find your new Catalog (you can search for a phrase to reduce the number of catalogs shown) and click on the first icon to the left of the pen icon, in our Catalog entry. This will display the current structure of the Catalog. Find the Section and click on the pen icon to start editing. Then click onCreate Pageon the Section screen.

Unfold a Catalog to edit it
Make sure that the URI Path of the new Page is unique. You can change it as shown in the previous steps.
Enter the Page
Title. In our case, we use “Dataset Information” for the title. It will be displayed prominently at the top of the Page in the questionnaire.Next, we enter the
Short title. This will be used in navigation bars and menus. We use “Data Info” as the short title.You can also provide useful information for users in the
Helpfield, e.g. explain what this Page is about.Click the checkbox next to
is collection.

Creating a Page as a Collection
Info
Background information: A Page that is a Collection will have several tabs. Each tab will contain the same Questions (and Question sets). A common case is a project with several datasets. The datasets are quite different and you expect researchers to give different answers to the same Question for each dataset. For example, you want to ask whether the data contains personal information. A project may have datasets with and without personal data. So it makes sense to create two datasets. Each will correspond to a different tab on a Page.
RDMO Pages that are Collections will show tabs like this:

Default Tab Name
In the figure above the user has already created two tabs: “#1” and “#2”. Each tab will contain the same Questions. However, using numbers to label the tabs is not ideal because the datasets corresponding to the tabs should have names or at least some meaningful classification such as “Interview Data” or “Simulation Output”. Let’s move on to the next step to fix this.

Customised Tab Name
The input field
Nameis the label displayed on the button that allows you to add a new tab. If you do not specify aName, RDMO will use the generic term “Set”, as shown in the screenshot above. We choose “Dataset” as the button label. Here is an idea of how it will look like to the users later on:
Customised Tab Name
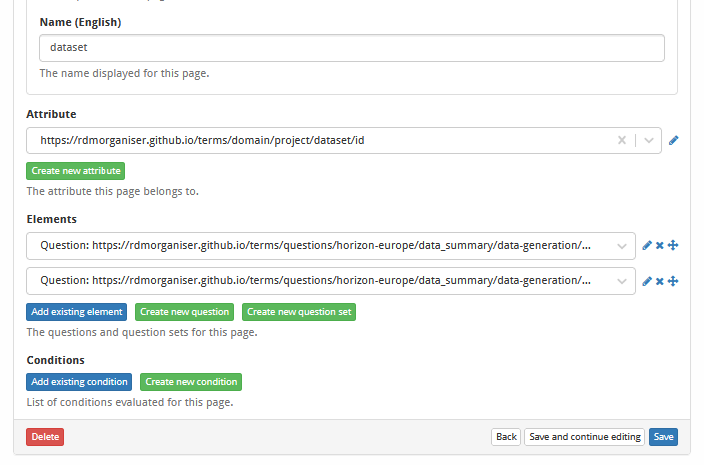
The next step is to select an Attribute (note: we did not do this for the first page we created). When you make a page (or later a questionset) a Collection, you should always assign an Attribute to this page.
Now, click on the drop-down menu. You will see all the attributes that your RDMO instance contains. As we have imported the default RDMO Attributes, you should already see a large number of possible attributes. As we want to have tabs corresponding to datasets, we select the attribute:
https://rdmorganiser.github.io/terms/domain/project/dataset/id
Note the semantics of the Attribute name. A project will have datasets and a dataset will have an id (e.g. its name or an acronym - this will be set by the users when they fill in the questionnaire in RDMO).
Instead of scrolling, you can also start by typing “dataset”. This will reduce the options the drop-down menu offers.
Info
Why did we assign an attribute to the page? Remember that by checking is collection we have ensured that the page will have tabs. By assigning an Attribute to this Page, we give the users the ability to give the tabs a label of their choice. Without an Attribute, the tabs will simply be labelled “#1”, “#2”, “#3”, etc. If we want to give the users the ability to name their datasets, we need to assign an Attribute. It is common practice to assign an attribute called “…/id”, if available. The Attribute is needed by RDMO to be able to access the user input later.
Info
Using one Attribute multiple times? If we later want to ask for additional information about the datasets in the questionnaire, we could create an additional page, make it a collection and assign the same attribute (e.g. https://rdmorganiser.github.io/terms/domain/project/dataset/id). RDMO would then know that this page will also have a tab for each dataset. This is the only exception to the rule of never using the same Attribute more than once.
This is very useful if your questionnaire is longer. We will not use it in the short DMP example we are building in this guide.
Now click on the button
Create and continue editing.
What we do not need to fill in:
We will also ignore the Conditions part for now. This feature allows us to show or hide pages (and Question sets and Questions) depending on the user’s answers to previous questions. We will skip this feature for this basic guide.
Adding Question sets to Pages
We are now going to add new elements to our page. Elements can be Questions or a Question set. In our example, we want to use this second page to contain a question set that collects information about datasets. We could add existing ones by clicking on ´Add existing element´ in the Elements area, but in this case we will click on Create new question set.
Adding Elements to the Page
Creating a new Question set
Again, there are several fields we need to fill in to create a new Question set.
We want to query the creator(s) of the dataset. So we will fill in the usual fields (
URI Path,Title,Help,Name, etc.) accordingly:

Create a Question Set
Since a dataset can have more than one creator, we want to be able to add (additional) creators. So we will make this Question set a Collection. This will cause RDMO to display a button below the block to add another question block like this:

Exemplary Question for Collections
For the Attribute we have selected:
https://rdmorganiser.github.io/terms/domain/project/dataset/creatorThe label of the button is set by the
Namefield - in our case “Add Creator”. This is analogous to the case of a Page, where the label for adding a new tab was set by theNamefield.Now click on
Create and continue editing.
Adding Questions to Question sets
We are going to add a Question that asks for the name of the contributor. To do this, we click on the Create new question button. If we do this in the context of our current Question set, the Question will automatically be linked to the question set.

Including Questions into Question Sets
Make sure that the
URI PrefixandURI Pathare unique.The
Textis the Question you want to ask. Here we can write “Enter person’s full name” or “What is the creator’s name?”.The
Helpfield again can be used to provide helpful information. In this case we give an example of an entry.We do not need the
Namefield, because the Question is not a Collection. But it would be no problem to enter some text in this field.We also need to specify an attribute. We choose the appropriate Attribute
https://rdmorganiser.github.io/terms/domain/project/dataset/creator/nameThe
Widget typeallows you to define the type and the answer choices of your current Question. E.g.Textareafor long answers,Textfor short answers, orRadio buttonsfor predefined answers. We will look at radio buttons later when we add a second Question to this Page. Here we will chooseText, as usually only one line is needed for names.Now click on
Create. This should take you back to the Question set. You should also see that the Question set now has one item: the Question we just created.
Adding a second Question to our Question set
Let us add a second Question:
We add a new Question to ask for the primary email address of the creator.

Including a second Question into the Question Set
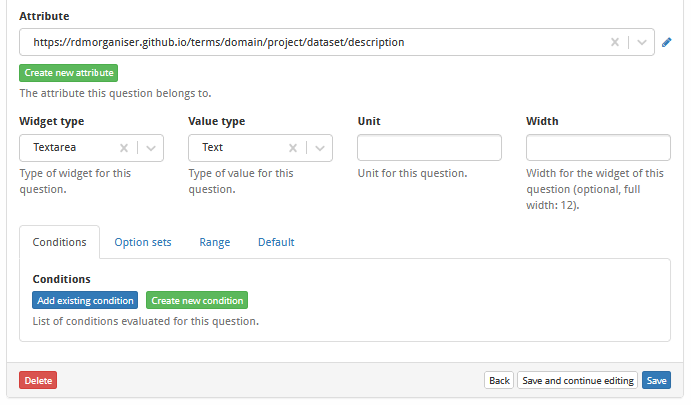
Fill in the necessary fields as explained earlier. For this Question we will again use the widget type
Textand use the value typeE-mail.

Set up the Widget Type
When looking for a fitting attribute, we do not find a perfect match. For the sake of simplicity in this guide, we choose
https://rdmorganiser.github.io/terms/domain/project/dataset/preservation/responsible_person/email
But it is not ideal, as the semantics indicate that it is the e-mail address of a person responsible for the preservation of the dataset. We could also create a new attribute, but we want to avoid this extra work for now.
Click on
Createand finish creating this Question. You should now be back at the level of our Question set. At the bottom of the Elements pane, you should now see the two questions that are part of this Question set.

List of elements within a Question Set
Now we are going to add an additional Question to our Page that is not part of the Question set. Click on
Save.Then click on Pages on the Navigation bar on the right. RDMO will display a list of all Pages. Type in the filter field to find our Page called “Dataset information” (or the title you chose).

List of Pages
Click on the edit (pencil) icon to edit the Page.
Adding Questions to Pages
We will now add another new element, a Question, to our Page.
Click on
Create new questionin the Elements area.
Adding Elements to a Page
This time we want to create a radio button where users can choose how much storage space is required for the dataset.

Create Storage Question
Fill in the default fields as before.
Assign the Attribute
https://rdmorganiser.github.io/terms/domain/project/dataset/storageUse Widget type
Radio buttonand the value typeOptions.

Choose a Widget Type
Now, click on
Option setsand onAdd existing optionset. We choosehttps://rdmorganiser.github.io/terms/options/dfg_dataset_size_options
as Option set.

Selecting an Option Set
Info
Why did we choose the radio button? In this scenario, we want to give the user multiple choices and allow them to select one. This is achieved by using the “Radio button” Widget type. When choosing this widget type, we also need to tell RDMO where to find the answer choices. This is done by selecting the value type Options and then assigning an Option set to the Question. Options sets contain answer choices that can be used. Here we use an Options set that does what we want it to do.
It will take some time to get to know all the options that RDMO provides through the default Option sets that we installed at the very beginning of this guide. You can also create your own Option sets and Options and share them with the community if you wish. However, this is covered in a separate guide.
Check that everything has worked
Click on
CatalogsIn the right-hand navigation area. This will display all available Catalogs. Find your new Catalog (you can search for a phrase to reduce the number of catalogs shown).Next click on the first icon to the left, left of the pen icon, in our Catalog entry.

Catalog Overview
You will see this:

Catalog Overview if unfolded
This picture shows the entire structure of the Catalog. This representation is also very useful if you want to add to or modify an existing Catalog. Note that you can edit any component by clicking on the corresponding pen icon. The rightmost icon (double-crossed arrows) can be used to rearrange the order of items. Icons
Now go back to the RDMO home page (you can usually just click on the name of the RDMO instance in the top navigation bar - it is on the very left).
You are now in the overview of all your available projects. In our case, this is an empty list.
Creating a first project with the new catalog
Click on New project

Empty Project List
Give the project a Title and choose our new Catalog “Meaningful Catalog”. Add a nice description and click on Create project.

Provide Project Informations
Now go to Answer questions (at the top right area of the page).
This is what you should see:

Project Page
Create a first Dataset by clicking on the +Dataset button (this will generate your first tab on the page) and give it a descriptive name.

Add a new dataset to your anwsers
The Page should now display our Question set for the creators and the single Question regarding storage volume. The title you gave the dataset should now be displayed in a tab, and you can add more tabs (for more datasets) by clicking on the +Dataset tab. Recall: this is why we ticked the is collection box in the Page form.
You can fill in the first creator’s data. Note that there should be a button to + Add Creator. Press it and see if an additional field for a second creator appears.

Add a new Creator
Finally, you should see a radio button menu. The available options are defined in the Optionset that we linked when setting up the question. If we wanted different options, e.g. different data volumes, we would have to create a new Optionset.
How to add Options to your RDMO
If you have never created a Catalog in RDMO before, we recommend you start with the step-by-step guide to Creating a new Catalog. Creating new Options is easier than creating a new questionnaire, but knowing the parts of a questionnaire (called a Catalog in RDMO) will help you understand what Options are for.
We will assume that your RDMO already has the default domain with Attributes and the default Options (see Initial setup for a guide to installing these).
In this example, we want to offer users a selection of experimental techniques for an [[Omics]] project. Since Options in RDMO are grouped in Optionsets. We will start by creating a new Optionset.
Creating a new Optionset
First, navigate to the Management section in RDMO. This can be done by clicking on Management in the top navigation bar. Then click on Option sets in the navigation area on the right.
Click on the New button at the top-right corner to start creating a new Option set.
The top fields in the form URI Path and URI Prefix should be familiar from creating Catalogs - if not, have a look at this section.
The comment field can be used to give RDMO managers an idea of what the option set is about and how it will be used. We enter “This option set provides various experimental methods for omics research. Intended for offering users a specialised selection of methods used to create a generated dataset.”
The order determines where the new set will appear in the list of option sets. Choose any number that makes sense.
You can use the Locked checkbox to prevent the set from being changed. We leave it unchecked.
Now click on “Create and continue editing” at the bottom.
Adding Options and additional properties of an option set
You will notice that it is possible to add Options to this Option set, as well as Conditions and a Provider. For this simple case, we will skip Conditions and also Option Providers - there will be separate tutorials for these more advanced features later.
For now, we want to add a new Option to this Option set. We will add existing options later.
Click “Create new option”.
Creating a new option
Again fill in the URI Path and, if empty, the URI Prefix.
Next, fill in the Text (this is what RDMO will display to users) - it should be short. We choose “DNA Methylation Assay”.
Optionally, you can also enter the Help text for users. This additional text will be displayed in light grey with the Option Text.
The View text is only used by RDMO in views and can be used to provide a more detailed text for the option.
Next, the Additional input field must be selected. We do not need a text field or a text area for this option, so we select “—–”. We will use a different choice later in this guide.
Finally, click Create.
Creating a second new option with additional input
You should be returned to the original option set. The new option should be displayed. Let us add another Option to this option set.
Click on “Create new option” again. We want to add “spatially resolved transcriptomic” as a broader approach and allow the users to add their specific flavour of method in a text field.
We add URI Path and Text as well as Help and View Text as follows:
URI Path: option_SRT
Text: spatially resolved transcriptomics
Help: Add the specific techniques (e.g. GeoMX DSP, PIXEL-seq or DNA-MERFISH) in the text field.
View text: Single-cell spatial transcriptomics methods will be used, in particular
This is identical to the first Option we created. Now we still need to allow the users to add the specific methods as our help text suggests.
Click “Create”.
Add an existing Option
You should now be back with your Option set. We are going to add a final third Option that already exists.
Click on “Add existing option”. A drop-down menu will appear containing all the Options available on your RDMO instance.
If you installed the default RDMO Options you should already see quite a few.
Click on the drop-down menu. Start typing and type “documentation/other”.
You should only see one entry. Click on it. We will see what this Option does when we use our Option set in a Question.
Click “Save” at the bottom.
Use the option in a Question
Finally, we need to use the option in a Question. If you already know how to add Questions to a Catalog try it yourself.
If you do not know how to do this: Go through the Creating a new Catalog tutorial, except in the Add a Question to our Page step, you can add your new Question set instead of the one suggested there. The question text won’t fit exactly, but you will see your Question set in action.
Understanding Attributes
Attributes are at the heart of RDMO, linking content elements to project values. They play a crucial role in ensuring consistency and interoperability across different Catalogs and RDMO instances.
The answers given by a user are stored in this attribute and are not lost. This can be an advantage, as the answers will be displayed even if the user changes the catalog within a project created in RDMO. At the same time, however, there is a potential for danger:
If you use a particular attribute for a certain question in the first catalog, but the same attribute for a different type of question in another catalog, the answers that were first entered by the user first will be retained, but may no longer make sense. If the user overwrites them in the second catalog, they will no longer make sense for the first catalog when they switch again.

One Attribute for different Contexts
The answers stored in the attributes are only exchanged within a project. If the user creates another project in which they answer a different catalog, no information is transferred.
The RDMO domain contains 304 (01/25) hierarchically ordered attributes covering most aspects of RDM.
The attributes are logically divided into three parts:
URI Prefix: A character string structured as an URL. The default RDMO URI Prefix is the address of the institution, such as „https://your-institution.de/terms“.
Element type (in this case “/domain/”)
URI Path
a) URI Path: The path provides information about the content of the question, with the scope being defined more and more concretely through the hierarchical structure. Separated by slashes, you work your way forward until you reach the “key”. As the name of the attribute should reflect the information expected when answering the question, the scope can be narrowed down.
For example, if you want to ask who is the project manager for a project, proceed from the general to the specific as follows: All in all, these are project-specific questions. So the top level of the path is the “project”. Then you want to get general information about its coordination, so you select “coordination” next. As you are looking for a person, the next level would be “name”. The full attribute is then “ https://rdmorganiser.github.io/terms/domain/project/coordination/name”.
b) URI Key: The key within the path is the last word, which is separated by a slash, and represents the most concrete level for identifying the question.
The URI path can be very short, containing only a few terms, or it can be very long, depending on how many levels there are. It is advisable not to make the structures too specific so that the area does not become too small and the attributes can be better used.
When creating a catalog, each Question must use an attribute, which appears only once in it.
Question sets can also be linked to an attribute as well. The default attribute here is “https://rdmorganiser.github.io/terms/domain/project/dataset/id”.
The use of attributes for Question sets does not affect the questions presented to users. Only when the „is collection“-Button is enabled can the user create „datasets“ when answering the catalog:

Provide Datasets
Overview of existing Attributes and usage: Attribute Overview
How to choose an Attribute
There is no best practice on how to choose an attribute so far. If you’re not sure, please contact the RDMO group.
The steps you can take are the following:
Review Existing Attributes: Familiarize yourself with the RDMO domain, which contains 304 (01/2025) hierarchically ordered attributes. Identify the specific information your Question is trying to capture and look for Attributes that closely match your intent. Attributes in RDMO are organized in a tree-like structure, so navigate through the hierarchy to find the most relevant category. You can also have a look into RDMO Terms to find questions and their related attributes.
Check Attribute Properties: Each Attribute has properties such as URI, key, and parent. Ensure these properties align with the context of your Question. Example: The Attribute with the path
project/schedule/project_startrepresents the start date of a project. The Attribute key isproject_start. Its parent Attribute is theproject/scheduleAttribute, which itself is a sub-Attribute ofproject. When creating a Page Collection, you should select the appropriate Attribute. ![Overview of available Attributes][image27]
Cases where you’ll need to create a new Attribute:
Be sure that there is no matching attribute! Even if the name of an attribute does not literally reflect the question, they are open enough to cover similar question content. For example, if you want to query when a campaign starts (instead of a project), you can still use the attribute “https://rdmorganiser.github.io/terms/domain/project/schedule/project_start” (if you have not already used it in the catalog), because you want to have similar pieces of information.
Discipline-Specific Information: when capturing data unique to your field that isn’t covered by existing Attributes. Example: Specialized lab techniques or data formats or Institution-Specific Requirements: For information specific to your institution’s policies or processes.
New RDM Aspects:
If addressing a new area of Research Data Management not currently in the existing Attribute set.If you have created a new attribute, the catalog is no longer so easy to reuse. When setting up an RDMO instance or a release, only the attributes that are in the domain are implemented
You can contact the RDMO group and ask to include your attribute in the domain as well.
You must provide the .xml including your attributes when sharing the catalog. The document describing the attributes has to be uploaded before the catalog. When sharing the “XML full” catalog, this remark is not relevant.
How to use Conditions in your Catalog
RDMO offers the option of skipping or hiding questions that are not relevant to users with the help of Conditions. This is controlled by a so-called decision question. For example, if users click on the answer option “No, no sensitive data is used”, the subsequent questions about sensitive data are automatically skipped. If a question has multiple answer options, a different condition can be selected for each option, resulting in different behaviour depending on the answer selected. For example, different Questions sets can be displayed or skipped. Conditions are always linked to Option sets, Questions, or Tasks and disable or enable them. They can also be used in Views.
We strongly recommend that you only create and use Conditions after you have compiled a complete list of Questions, because Conditions cause Questions to be skipped or hided. If you create and use Conditions too early, this can have the unintended effect of your questions not being displayed in the Catalog.
How to create new Conditions
First, navigate to the Management section in RDMO. This can be done by clicking on Management in the top navigation bar. Then click on Conditions in the navigation area on the right and all Conditions available will appear. You can filter the Conditions using search terms, or by the URI prefixes used or the site in the case of a multi-site instance.
Click on the New button in the top-right corner to start creating a new Condition.
The top fields in the form URI Path and URI Prefix should be familiar from creating Catalogs - if not, have a look at this section.
The comment field can be used to give RDMO managers an idea of what the Condition is about and how it will be used. We enter “This condition checks whether sensitive data being handled in the project”
You can use the ``Locked` checkbox to prevent the Condition from being changed. We leave it unchecked.
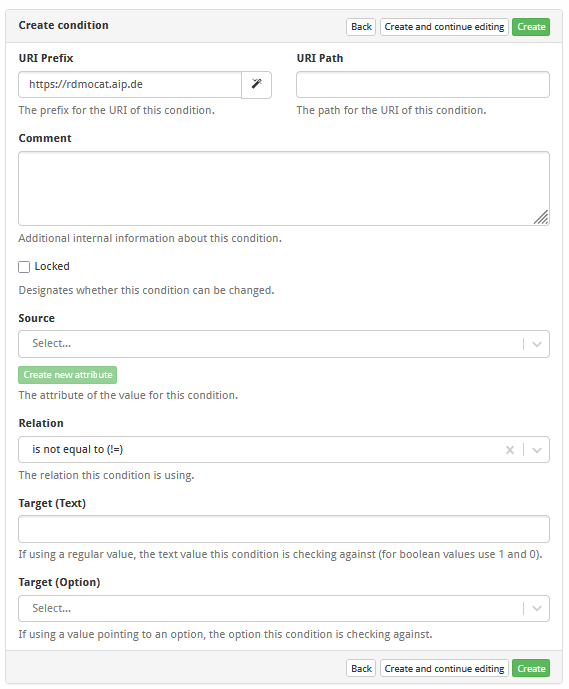
All condition settings
The Source defines which Attribute is evaluated by the Condition. You select an Attribute from the Catalog (or you can create a new Attribute), and the value stored for this Attribute in the project is compared against the Condition’s target value. Whatever value the user enters or selects for that Attribute will be used in the comparison.
The Relation defines how the value of the source Attribute is compared to the target value. The Condition relations include:
Relation |
Description |
Target (Text) |
Target (Option) |
|---|---|---|---|
is equal to (==) |
Checks whether the answer is exactly this text or option |
✓ |
✓ |
is not equal to (!=) |
Checks whether the answer is any text or option other than this one |
✓ |
✓ |
contains |
Checks whether the text answer contains the given text fragment |
✓ |
– |
is greater than (>) |
Checks whether the numeric answer is greater than the given value |
✓ |
– |
is greater than or equal (>=) |
Checks whether the numeric answer is greater than or equal to the given value |
✓ |
– |
is less than (<) |
Checks whether the numeric answer is less than the given value |
✓ |
– |
is less than or equal (<=) |
Checks whether the numeric answer is less than or equal to the given value |
✓ |
– |
is empty |
Checks whether no answer has been given |
– |
– |
is not empty |
Checks whether any answer has been given |
– |
– |
The last two relational operators is empty and is not empty do not require a target value.
The Target is the value the source attribute is compared against. Depending on the attribute, this may be:
Text: a string, boolean value or number to compare with the attribute value
Option: one of the predefined options (in Option Sets) associated with the attribute
The correct type of target depends on the attribute’s configuration in the Catalog.
Conditions with a Target Text (including strings, boolean values, numbers)
In RDMO, text targets are used not only for strings but also for boolean values and numbers, depending on the type of the source attribute.
Text values: For attributes that store plain text, the target is a literal string. Text comparisons are case-sensitive meaning that uppercase and lowercase letters must match exactly for a condition to evaluate as true. This allows precise control when checking specific text values but also requires that the target be entered exactly as the attribute value appears.
As relation you can choose between
is equal to
is not equal to
contains
Boolean values: Boolean attribute values are represented as numeric strings (1 = yes, 0 = no). Use these values as the target when you want the Condition to check whether a user selected yes or no in a boolean question.
As relation you can choose between
is equal to
is not equal to
Numbers: For numeric attributes, the target must be a plain number. These targets are written as plain numbers without additional formatting.
As relation you can choose between
is equal to
is not equal to
is greater than
is greater than or equal
is less than
is less than or equal
Conditions with a Target Option
In addition to targeting text answers, Conditions can also be used to check selected options. In the condition settings, you can select a specific option in Target (Option). For this to work correctly, do not add any text to the Target (Text) setting.
Not all relations work with options, you can choose between two relations for Target (Options):
is equal to
is not equal to
You can not select multiple options.
Select Editors (only in multi-site instance of RDMO)
In a multi-site RDMO installation, you can control which user groups are allowed to edit a Condition. Under Editors, you can link one or more groups of Editors. Only members of the assigned groups will be able to modify the Condition.
How to add a condition to your Catalog
Adding Conditions to Sections, Pages or Question Sets
Open the Section, Page or Question Set where you would like to add the condition
Scroll down to Conditions and Click on
Add existing condition. A drop-down menu will appear containing all the conditions available on your RDMO instance.Click on the drop-down menu and type the name of the condition you created
After selecting your condition, click on
save
Add a condition to a page
Adding Conditions to Questions
Open the Question where you would like to add the Condition
Scroll down to Conditions and Click on
Add existing condition. A drop-down menu will appear containing all the conditions available on your RDMO instance.Click on the drop-down menu and type the name of the condition you created
After selecting your condition, click on
save
Add a condition to a question
Info
If you add multiple Conditions to a Question, all conditions are combined with a logical OR, which means, if just one of those conditions is met, the element is visible.
Adding Tasks to your RDMO
Using tasks you can add an additional layer to your RDMO Catalog. Tasks are visible directly on the project page and can help users remember important data management tasks. Users can open a task to view its detailed description and see the related question in the interview.
Each task is linked to a Condition and to specific Catalogs. When the condition is met, the task is displayed and users can interact with it and change its status (open, in progress, closed). This can be used, for example, to display a “Contact your Data Protection Officer” task when a user indicates in the interview that personal data will be collected during the research project. In addition, you can also use tasks for other purposes, e.g. to show recommendations, when a user selects certain options.
For each task you can define a time frame based on the project’s start and end dates. Tasks can then be displayed relative to these dates, for example one or two months after the project starts or ends.
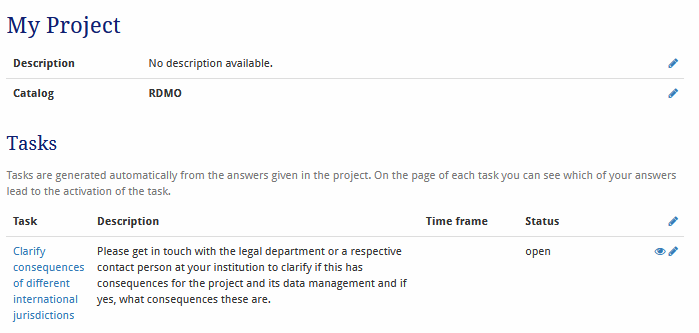
A task on the project page
How to create new Tasks
First, navigate to the Management section in RDMO. This can be done by clicking on Management in the top navigation bar. Then click on Tasks in the navigation area on the right and all Tasks available will appear. You can filter the Tasks using search terms, or by the URI prefixes used or the site in the case of a multi-site instance.
Click on the New button in the top-right corner to start creating a new Task.
The top fields in the form URI Path and URI Prefix should be familiar from creating Catalogs - if not, have a look at this section.
The comment field can be used to give RDMO editors an idea of what the Task is about and how it will be used. We enter “This task reminds users to identify the rights owner and to contact them if the answer in the catalog indicates that this was not done yet.”
You can use the Locked checkbox to prevent a Task from being modified. By default, it is left unchecked. The `Available button indicates whether the task is visible to users. If unchecked, the task will not appear in the user’s task list. The Order determines the position of the task within the list of all existing tasks. You can choose any number that makes sense.
Next, you can add the short and meaningful title (e.g. “Contact rights owner”) and a description (field ‘text’) for your task. The description specifiy what one has to do to accomplish this task (e.g. “Clarify, if and how this restricts the possibility of long-term preservation and re-use and if the rights onwer ist willing to grant the necessary rights.”). Both will be displayed in the project overview.
Tasks depend on conditions. Each task must be linked to one or more conditions, and it will only be displayed if at least one of the conditions evaluates to true.
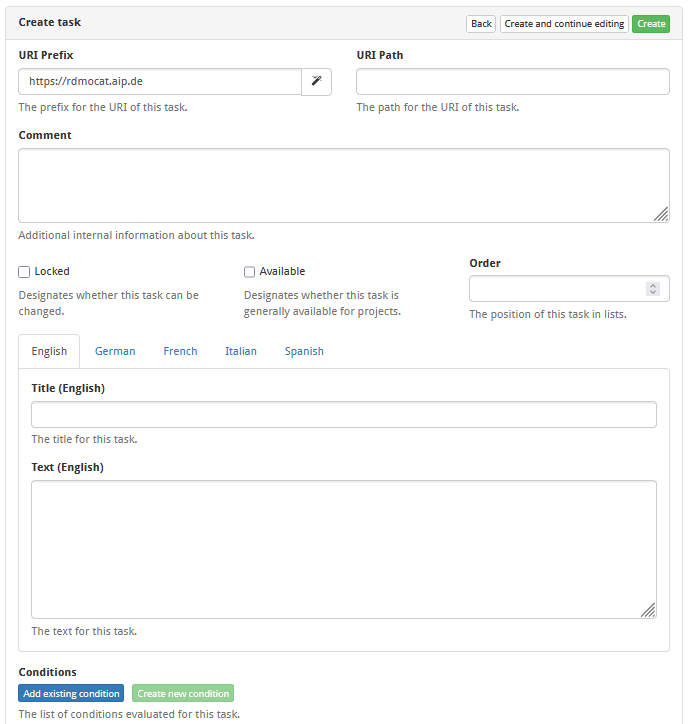
General task settings
Make a task date sensitive
If your Catalog asks users to specify dates, e.g. start and end data of the project, you can use this information to schedule tasks in relation to the dates specified.
With setting Start date attribute and End data attribute you can assign the related attributes of the questions. With Days before or Days after you can define in relation to the date stored in the attribute, when a task is visible.
Select at least one Catalog
The Catalogs field lets you choose the catalogs in which this task can be used. Not specifying a catalog and leaving the list empty implies that this task can be used with every catalog.
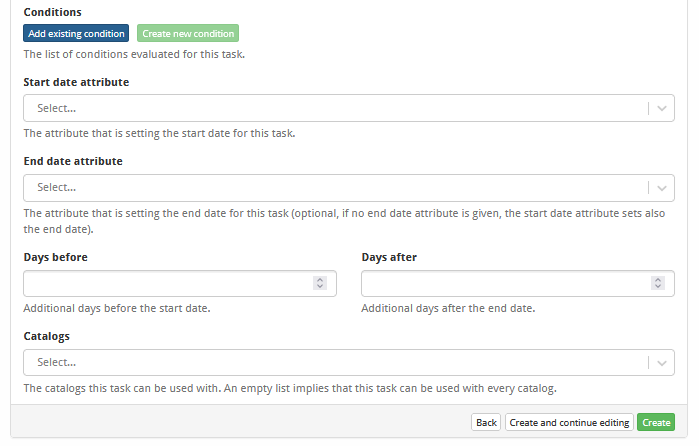
Date and Catalog task settings
How to add a task to your catalog
Open the task settings
Select your Catalog in the Catalogs setting at the bottom
Info
If the Catalogs list is empty, the task is by default active for all catalogs.
Glossary: Basics
In this section, you will learn about the basic elements of RDMO to create your own questionnaire. To create a Catalog in RDMO, you need to understand the hierarchical structure and the relationships between the different components. Here’s a breakdown of how to build a Catalog structure:
Catalog
The top-level container for your questionnaire
Contains multiple Sections
Once a catalogue has been completed it can be exported in a variety of formats.
URI prefix
A URI Prefix acts as a unique identifier for your RDMO instance, this is particularly important when different instances are sharing data.
The default URI Prefix can be set in the RDMO configuration file (local.py), which usually requires administrative access to change, so if it’s defined, don’t change it.
URI path
It is the part of the URI that comes after the prefix.
It is typically a string of characters separated by forward slashes (“/”) and is primarily used as an internal identifier to locate specific items or resources within the RDMO system. When combined with the URI Prefix, it forms the full URI of an item.
Sections
Pages
Subdivisions of Sections that contain and organise Questions and Question sets
A Page corresponds to a visible screen in the user interview process
Collection
A collection in RDMO allows for multiple sets of answers to the same group of Questions. You can select the collection option for a Page, Question, or Question set. Each instance of a collection contains the same set of Questions but can have different answers, making it useful for cases where similar information needs to be entered multiple times. This feature creates more dynamic and flexible questionnaires that adapt to different project structures. For example, if you have a Page about “Dataset Description” and mark it as a collection, researchers can describe multiple datasets within the same project. This is particularly useful when collecting information about multiple datasets, research methods, or project partners in a single project.
At the Question level, a collection allows the answer field to a Question to be answered more than once.
At the level of Question sets, the collection allows Option sets to be duplicated and used multiple times.
At the Page level, collections allow users to create sets (data sets or subsets of the project data, which are always represented by tabs). This means that every Question belonging to this page must be answered for each data set.
Question Sets
Questions
A question has a text, which will be shown in bold to the user and can accept different response formats (Widgets).
Must be associated with Attributes in the domain model in order to store and retrieve user responses.
Widget type
The data structure in which the information is stored is hierarchical. The lowest level is the answer to the question. Widget type dictates how the user will respond to a Question.
The information to be stored as an answer to a Question is entered using one of the following input options appropriate to the Question.
Text line (unwrapped)
Text area consisting of a variable number of wrapped lines
Yes/No as a simple binary input to gather affirmative or negative responses from users
Range slider to select an ordinal level from a given range
Date picker to select a date from a calendar
File upload field for entering a file name or a window to facilitate the selection of a file stored on the computer.
The other input options are based on fixed sets of pre-defined answer options, so-called Option sets:
Checkboxes allow multiple answers to be selected.
Radio buttons allow the selection of only one answer from a list of choices displayed at once.
Drop-down menu stores an Option set and presents the options in a collapsed format.. Users have to click to reveal all the options. This is ideal for saving screen space when there are many options. It is possible to pre-define one or more answer options in advance.
Autocomplete offers a list of suggested and predefined options as the user starts typing in the input field. The user can only choose from the suggested list.
Free autocomplete works in the same way as autocomplete, but allows entries other than those from the fixed set of choice options.
Conditions
Conditions control if the Questions or Question sets will or will not be shown to the user during the interview depending on their given answer to certain questions.
They are needed to disable/enable Option sets and Tasks and can also be used in Views.
Icons
![]()
Icons
With this icon set, which is available at the Catalog level, you can for example add elements or download your catalog. We explain them from the left to the right. The first icon will show you the content of your questionnaire in a nested or hierarchical view. The second icon, the pencil, activates the edit mode of the element. With the third icon you can copy/duplicate the complete catalog. With the fourth icon, the big plus, you can add additional elements like question or question sets. The switch (fifth) icon can disable or enable a catalog. A disabled catalog will not be available for the users. With the sixth icon (lock icon) you can lock or unlock the catalog. If a catalog is locked, it isn’t possible to edit the catalog. If you want to download the whole catalog, you can do this with a click on the seventh, the export icon.
Option sets
Predefined list of answer choices used for Questions in RDMO catalogs. They are typically used with radio buttons, checkboxes, or dropdown menus. They provide standardized, reusable sets of answer choices that can be applied across various Questions in RDMO questionnaires.
They ensure consistency in answer choices across related Questions and simplify the questionnaire creation process.
Options
Options are the components of Option sets. For Example: You are creating a new Option set that will allow users to select where their data is archived. The Option set should offer users these choices:
“I will not archive any data.”
“Data are archived in our institutional repository.”
“Other: “
Each of the three possible answers is an Option in RDMO.
Options can be predetermined (like numbers 1 and 2 above), or they can have an Additional input where users can enter text. This would be the case for option 3 above.
You can reuse existing Options in new Option sets or create new ones.
An Option has a Text that is shown to the user (in our example above e.g. “I will not archive any data.”) as well as a Help text and a so-called View text. The View text is only relevant for Views and often missing in older Options. It determines what is displayed in RDMO views.
Tasks
Tasks display data management tasks which the user has to accomplish.
Views
Views can be used to select, arrange and format the answers or parts of the catalogue. Views are useful to reformat answers and to provide a streamlined, structured display of the answers.
Attributes
Attributes are at the heart of RDMO, linking content elements to project values. They play a crucial role in ensuring consistency and interoperability across different Catalogs and RDMO instances. You can learn more about them in the section Understanding Attributes.
How to contribute
If you have any issues by reading and understanding or any wishes what also should be included here, feel free to create an issue or contact the rdmo group directly via rdmo-contentgruppe@listserv.dfn.de.